Backup and Restore Root CA to Windows 2012/2016/2019
We may sometimes need to move/recover/upgrade Root CA due to OS corruption/upgradation or other requirements. It could be a tricky task since we need to retain the Private Key of Root CA otherwise it would create the problem of issued certificates and our organisation may face issues without root CA.
So here we discuss how to backup and restore a root CA in simple terms.
1. Backup Old Root CA
- Log on to your root CA, and open the Certificate Authority console.
- Right-click the CA name and go to All Tasks > Back up CA.

- On the Items to Backup Up, choose Private key and CA Certificate and Certificate database and certificate database log. Choose a backup directory like C:\

- In the Select a Password page, Enter a strong password. This password is used to protect the private key. Click Next and you are done.

You have now successfully exported the CA private key and database. Let us move on and export the CA configurations from the registry
Open the registry editor and Export the following registry:

- It is also a good idea to backup the file located in the C:\Windows directory if it exists.
- Finally, make sure you document the state of the old Root CA, like:
- Server Name.
- Drives layout.
- Location of the folders where the CA database and logs are stored.
- I also recommend taking Full Server Backup and System State Backup to the old root CA server just in case. System State backup is the best bit for restoring a CA server.
Tip: if you are into typing extra commands to feel in control, you can use the following commands to export the configuration of the old root CA.
certutil –getreg > C:\oldCA_config.txt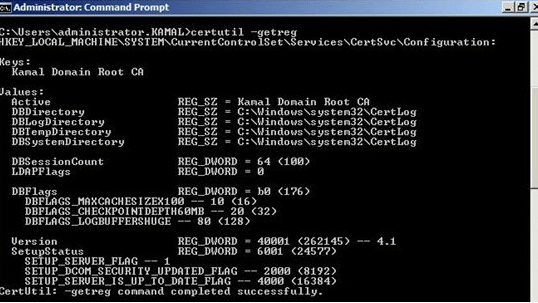
2. Restore Root CA
Install Windows 2012 R2 on a new server with the same name and Data Drives, make sure it is fully patched, and then follow the below steps:
- If in the old Root CA, you are storing the CA database in C:\DB and the CA DB logs at C:\Logs, then make sure to create these folders in advance on the new Windows 2012 R2 server.
- It is recommended that drives match. So if you have C and D drives in the old Root CA, make sure you have the same drives on the new Windows 2012 R2 server.
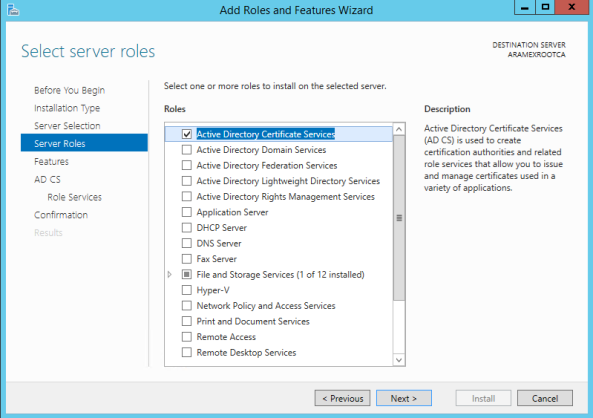
- Go to Server Manager and Click Add roles and features.

- Click Active Directory Certificate Services.

- Since this is Root CA, only pick the Certificate Authority role service. Complete the wizard till the end.

- Go to Server Manager again, click the flag icon that has a warning sign on it, and choose to Configure Active Directory Certificate Services.

- Select Certification Authority for services to configure.


- In this step, you have to choose the old Root CA private key file that you have from your backup.

- In the Certificate Database location page, make sure to choose the same location the old Root CA has. Pre-create folders if you are using custom locations.


- Now we have installed the Root CA on a new server and the only thing we have restored is the CA Private key.
- Open the Certification Authority Console. Right click the CA name, and choose All Tasks > Restore CA.

- Choose only the Certificate database and certificate database log. No need to choose the Private key and CA certificate as this was restored during the installation.
Note: An important note to mention here is the following. If you have clicked Browse and you’ve picked the folder named Database that the Backup wizard in the old Root CA generated before, you will get an ugly error. The restore wizard expects you to choose a folder that contains a sub-folder called DataBase, not to choose the DataBase folder itself.
Also Read: How to Upgrade Active Directory from 2008/2012/2016 to Server 2019/2022
Implementing DNS over TLS in Windows AD: A Step-by-Step Guide

Whether you’re looking for troubleshooting tips, deep dives into systems architecture, or the latest in cloud computing, At Yourcomputer.in, I’m here to help you navigate the evolving tech landscape. Let’s connect, learn, and grow together!
📧 ravi.chopra1709@gmail.com
- Why should you automate Active Directory cleanup? - 17 June 2025
- Troubleshooting: Unable to Add Instance Failover Group to Azure SQL Managed Instance - 4 March 2025
- 10 Azure Virtual Desktop (AVD) Cost-Optimization Strategies for 2025 💡💰 - 22 February 2025